If you can’t find a solution to your issue, please send an email to our Support Team. When sending technical queries please include Serial Number & Software versions where appropriate as this may speed up diagnoses of problems.
-
DMX Driver Chip Replacement
The following consoles will contain an additional pair of DMX driver chips that are located on the ST-DMX Board (below the MIDI-IN port):
Tiger Touch II, Arena, Sapphire Touch and Titan Net Processor
When replacing the driver chip, you will need to make sure the chip is inserted correctly.
Please note: a DMX driver chip is also included in the spare parts kit for the following consoles:
Quartz, Tiger Touch II and ArenaIf you require additional driver chips, they can be ordered via your local Avolites Distributor.
Titan Mobile, Quartz, Tiger Touch II, Arena, Sapphire Touch
Part Number #05-03-0970
Tiger Touch/Pro, Pearl Expert/Pro
Part Number #05-03-0433 - Titan Remote Android Connection Issues
- Titan One and Titan Mobile Fixing Dongle Not Found after Software Update
- How can I update my panel firmware?
-
The touch screen on my console is not behaving as expected. How do I fix this?
If you are experiencing unusual touch screen behaviour (e.g. mouse going haywire), then the screen will need to be cleaned thoroughly. This includes the corner edges of the screen.
To clean the corner edges of the screen, you will need to use either a brush or a business card. Once you have cleaned the screen, apply a touch screen and sensitivity calibration.
-
.NET 4.7.2 Compatibility error during install
Titan Version 12 requires .NET 4.7.2 to run. If you have received the “.NET Compatibility” error during install this probably means your windows version is out of date. You might need to perform windows updates on windows 10 to get to one of these versions.
Supported versions are:
Windows 10 Anniversary Update and later (version 1607 and later) (x86 and x64)
Windows 8.1 (x86 and x64)
Windows 7 Service Pack 1 (x86 and x64) -
Downgrading from V12 to V11 – Unsupported DMX Firmware
Please note that using upgrade installers for older versions of Titan after running the V12 recovery is not currently supported and will prevent the console from starting if attempted. If you need to downgrade to a previous version it is important that this is done via a relevant recovery stick only. Consoles not starting following an attempt to use an earlier upgrade installer can be fixed by running a recovery stick and selecting Full Erase option (if recovering to a version prior to V12, you can reuse the license which was emailed to you previously).
When downgrading from V12 to previous versions of Titan it is also important that the Sapphire DMX panel firmware is downgraded in any consoles with ST-DMX cards (Sapphire Touch, TitanNet Processor, Tiger Touch II and Arena). This is because new features in the firmware are not compatible with previous versions. To downgrade the firmware open USB Expert Console and put any Sapphire DMX Panels into Boot Mode. This is found in the Service Tab. When the panels have re-appeared in boot mode, select Program which will open a file dialog. In the file dialog navigate to C:\Program Files (x86)\Avolites\UsbExpert\Panel Software and select the st_dmx.bin file. This will now install the previous ST-DMX firmware. Once this is complete do the same on all Sapphire DMX panels and then exit Boot mode. Now restart the console and you should now be OK to use the previous version of Titan. When you next upgrade to V12 you will need to carry out the firmware update again.
-
Intel Command Center Service Prevents Titan from starting
Intel has issued a driver update for their built in graphics cards that may cause issues with Titan starting up.
If you try and launch a PC suite application ( Simulator, TitanOne, TitanGo, and Mobile) and it does not complete start up and stays on the “pulsing grey Titan screen”. Also check in the Task Manager for windows if you see the “oneapp.igcc.winservice”, and or “Intel® Graphics Command Center Service” You will need to perform the following fix to
allow Titan to run again.This driver update may come thru a windows update or by installing the Intel drivers manually. The drivers lock up ports required by Titan to run correctly.
After confirming in the Task Manger of Windows (control- alt – delete on keyboard then select task manager from the pop up list) that the “oneapp.igcc.winservice”, and or “Intel® Graphics Command Center Service” are running do the following:
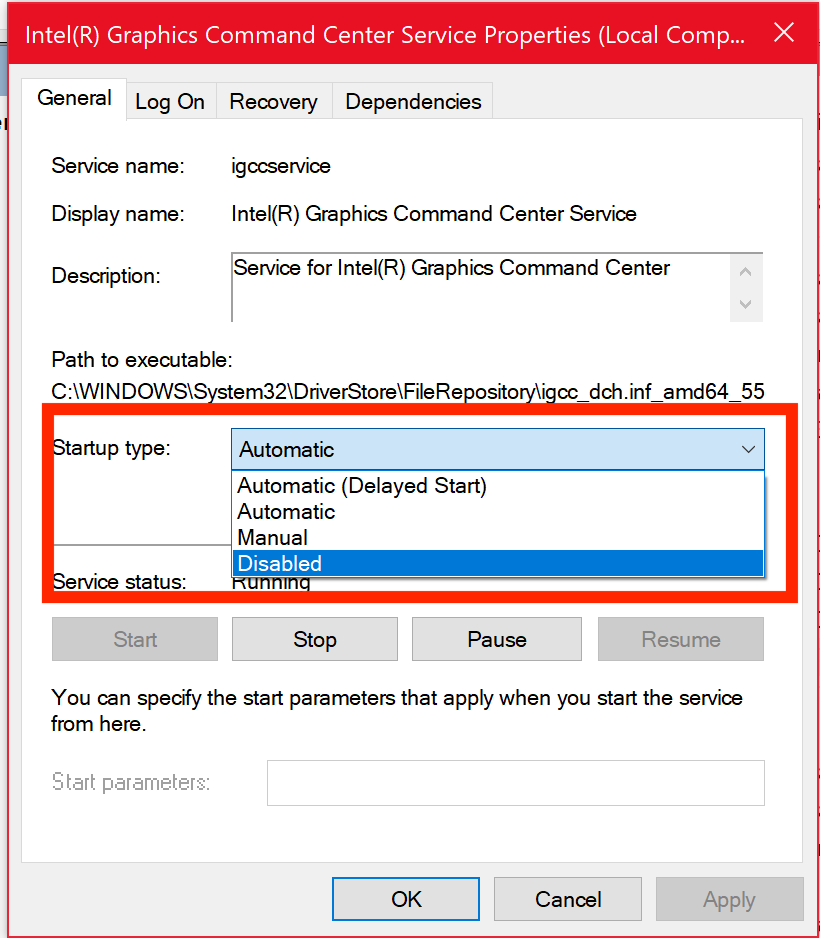
In Task Manger click the Services
At the bottom click the “Open Services
In the “Services” window that opens find “Intel (R) Graphics Command Center Service”
Double click on it
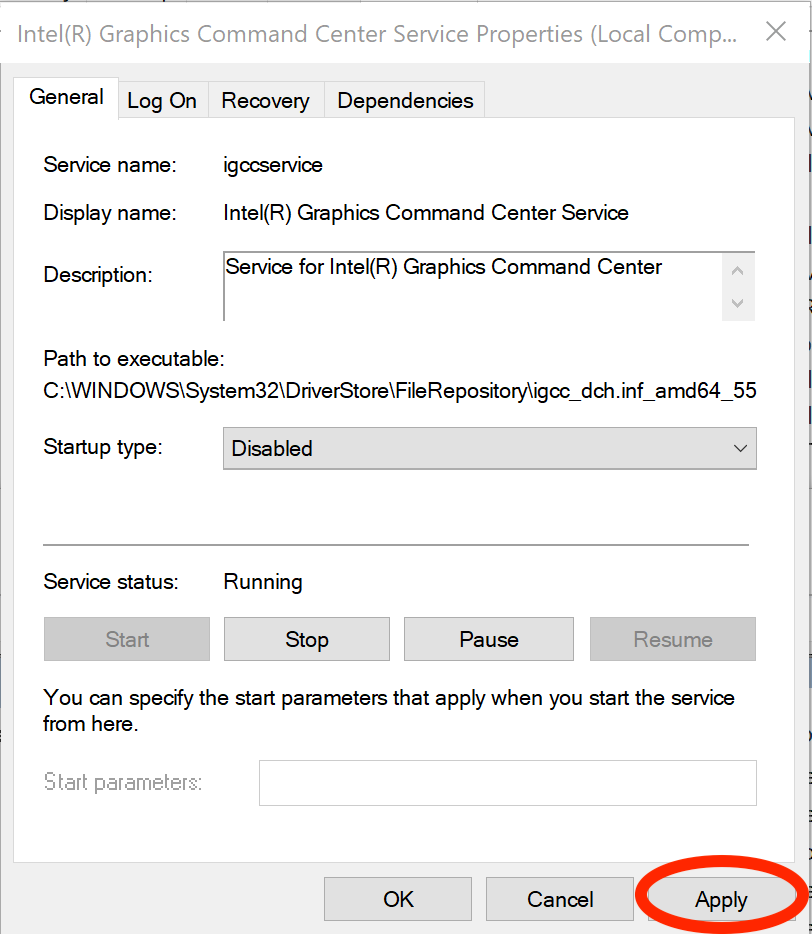
In the Window that opens, change the “Startup type” from “Automatic” to “Disabled”Click Apply
Close the “Intel(R) Graphics Command Center Service Properties” and the “Services” windows
Restart the computer.Titan should now launch and run correctly.
Thru our testing disabling this service does not seem to have adverse effects. If you have graphical errors outside of Titan, you may wish to do the same steps but change from “ Disabled” to “Automatic” and restart the computer again , then perform
the fix again next time you need Titan.A video of this has also been created here: https://youtu.be/wfJUFc2rCCE
Alternative steps provided by Intel (Not Recommended):
Uninstall all the drivers, as they are only generic and might not be compatible with the laptop.
Our Intel drivers are only generic, we provide our drivers to the laptop manufacturers and they modify them in order to work with their laptops.
The laptop manufacturers integrated the graphic processor and soldered it down to their motherboard, the laptop manufacturer assures the compatibility and the drivers.We strongly suggest to install only the drivers from the laptop manufacturer
installing incompatible drivers can create some registry issues. the following troubleshooting steps should be applied:Check that the OS isupdate to the latest version
1. Download the latest graphic driver from the laptop manufacturer website for that specific model of laptop and save it on the computer.
2. Disconnect from the Internet so no new drivers are automatically installed by Windows Update.
3. Uninstall the graphic driver and all the other legacy drivers from Control Panel > Programs and Features.
4. Restart the computer.
5. Confirm in Device Manager > Video Adapters the controller is listed as ‘Microsoft Basic Display Adapter’ > if not, repeat steps 2 through 4.
6. If the adapter continues to be listed as ‘Intel HD Graphics’ or similar, and no other Intel Graphics driver is listed under ‘Programs and Features’ for removal, then it means Windows has switched to a previously installed Legacy driver. At this
point we can remove Legacy drivers from Device Manager:
6.1.1 Right-click on ‘Intel HD Graphics’ or similar, and select ‘Uninstall Device’
6.1.2 In the pop-up window make sure ‘Delete the driver software for this device’ is checked.
6.1.3 Click on ‘Uninstall’.6.1.4 Restart. (Repeat steps 6.1.1 through 6.1.4 until the device gets listed as ‘Microsoft Basic Display Adapter’)
7. Install the graphic driver that was downloaded on step 1.
8. Restart the computer.
9. Reconnect to the Internet.
10. Download the Intel Graphics Command Centre from the Microsoft Store. ‘ -
Titan: Grey Pulsing Screen
For optimal performance, we recommend using a dedicated Windows PC that is not connected to the internet and has anti-virus/firewall services disabled, including Windows Defender. This is to prevent back-end communication issues required by the software and its services.
Alienware Command Center (AWCC) can prevent Titan from running correctly, this may affect users of Dell Alienware machines. Troubleshooting steps for this are currently unavailable and we would advise using an alternative machine.
Tested on Windows 10. Please ensure that all applicable updates have been installed. Windows XP, Windows Vista, Windows 7, Windows 8, Windows 8.1, Bootcamp and virtual machines, e.g. VMware, Parallels are not supported.
In some cases, Titan may launch and present a continuous grey pulsing screen which is related to any one of the following:
Titan.exe> application does not launch when starting Simulator, Titan One, Titan Go or Mobile. Two icons must be present on the taskbar. If this is not the case, then you will need to check the following:
Anti-virus and Firewall software (including Windows Defender) may block Titan from working properly on your machine. You will need to check the Titan.exe application exists in the following directory: C:\Program Files (x86)\Avolites\Titan (both Titan.exe and Titan.exe.config must be present).
You will also need to check none of the Avolites applications and services are being blocked by a Firewall.
If the above does not resolve the issue, then it is highly likely another application is using the ports Titan require. If your machine has Intel Graphics Command Center installed, then you will need to apply the following: https://www.avolites.com/support/titan-troubleshooting#2628295-intel-oneappigccwinservice-prevents-titan-from-starting
· V12.0 and above: AvoKey license has not been applied correctly. Please ensure you are importing the correct token file. If the incorrect token file has been imported the engine will start, however, the screen will continue to pulse grey.
V12.0 and above requires a new license request to be submitted via www.avolites.com/licensing. The following video will guide you through the process: https://www.youtube.com/watch?v=86PcC0OzL7E&t=33s
· V12.0 and above: Hardware and application mismatch (e.g. Using Editor Key to launch Mobile Application).
Additional Infomation:
Editor Keys will only Launch the Simulator or GO application (can be used with T1-00001 to T1-019999).
AvoKeys hardware locked to the Mobile will only launch the Simulator or Mobile application.
Need help? please visit https://www.avolites.com/software/help-desk and submit a ticket.
-
WebAPI Service Fails to Start
If you are having trouble connecting via WebAPI and you have tried all the normal network configuration steps please follow these steps to ascertain if there is an issue starting the USB Expert Service.
– on the console you are trying to connect to go to Tools | Control Panel | More and then select Administrator | Services.
– find the correct version of WebAPI in the services list, if the service is listed as not started click start.
– you should find the service starts and is listed as running, if it wont start then try the following steps to fix the issue.
FIX:
– open Explorer from the Tools menu and navigate to “c:\Windows\SysWOW64\config\systemprofile\AppData\Local\Avolites\WebApiService”, please note you may need to show hidden files from Folder Options to see this file.
– delete all folders that contain WebAPI
– now try to restart the service either from the Service manager or by clicking “Restart Software” from tools menu.
-
How to collect Titan and System Logs (PC & Console)
Sometimes, when troubleshooting complex issues with the Titan software and Avolites hardware, it’s necessary for us to get some additional information to troubleshoot the issue further and prevent it from happening again in the future.
To help us get to the root cause of the issue, please send a copy of your Avolites Logs. To generate these logs, please follow the steps listed below:
PC Suite
1. Open “Log Collector” by clicking the “Start” button then “Avolites”
2. Click the “Go” button and choose the desired save location (e.g. Desktop)
3. Click the “Ok” ButtonYou’re done! Please attach the compressed file to your email or case with us so that we can assist further. If the file size exceeds 20MB, please use a file transfer service of your choice and attach the link to your email or case.
Consoles
For this task you will need a USB drive.
1. Open “Log Collector” by clicking the “Tools” button then “Additional Programs”
2. Click the “Go” button and change the save location to the USB drive
3. Click the “Ok” ButtonYou’re done! Please attach the compressed file to your email or case with us so that we can assist further. If the file size exceeds 20MB, please use a file transfer service of your choice and attach the link to your email or case.
-
Titan Health Check: Open SLP Discovery error
If you have received an error with the Open SLP Discovery in the Titan Health Check, then you will need to apply the following:Locate the file ‘slp.conf’ in “C:\Windows\” and open the file for editing. Make sure the line with ‘net.slp.useScopes’ looks like the line below, then save the file.
net.slp.useScopes = DEFAULT,ACN-DEFAULT
-
Network Ports used by Titan
Titan uses the following ports over the network. If your network includes firewalls you might need to know these so you can set up rules for them.
Protocol Port Address Notes TitanNet TCP 808 All available adapters Titan Remote, TNPs, multi-user and backup HTTP TCP 4430 All available adapters Web API SLP UDP 427 Multicast 239.255.255.253 Used to discover TitanNet devices on the network Ping ICMP echo Any adapters that are in use Monitors connection to TitanNet devices Art-Net UDP 6454 By default all wired adapters sACN UDP 5568 Multicast 239.255.0.0-239.255.249.255 CITP UDP 4809/TCP Multicast 224.0.0.180 Used for communication with Capture Visualiser and media servers. Discovery done by multicast UDP then negotiates TCP connection RDMNet UDP 5569 ProDJ Tap UDP 60000-60002, 65023-65535 Protocol for getting data from Pioneer DJ equipment by software now known as TC-Supply LiveDMX UDP 5584 Multicast 239.184.0.0-239.184.249.255 Used for internal Visualiser DMX data NTP UDP 1234 Between TitanNet hosts Non-standard NTP port NDI UDP 5353 Multicast between NDI sources and Panel mDNS for NDI source discovery NDI UDP 49152-65535 Between NDI sources and the Panel NDI video streams -
The applications below may prevent Titan from starting correctly. Please Terminate before Proceeding…
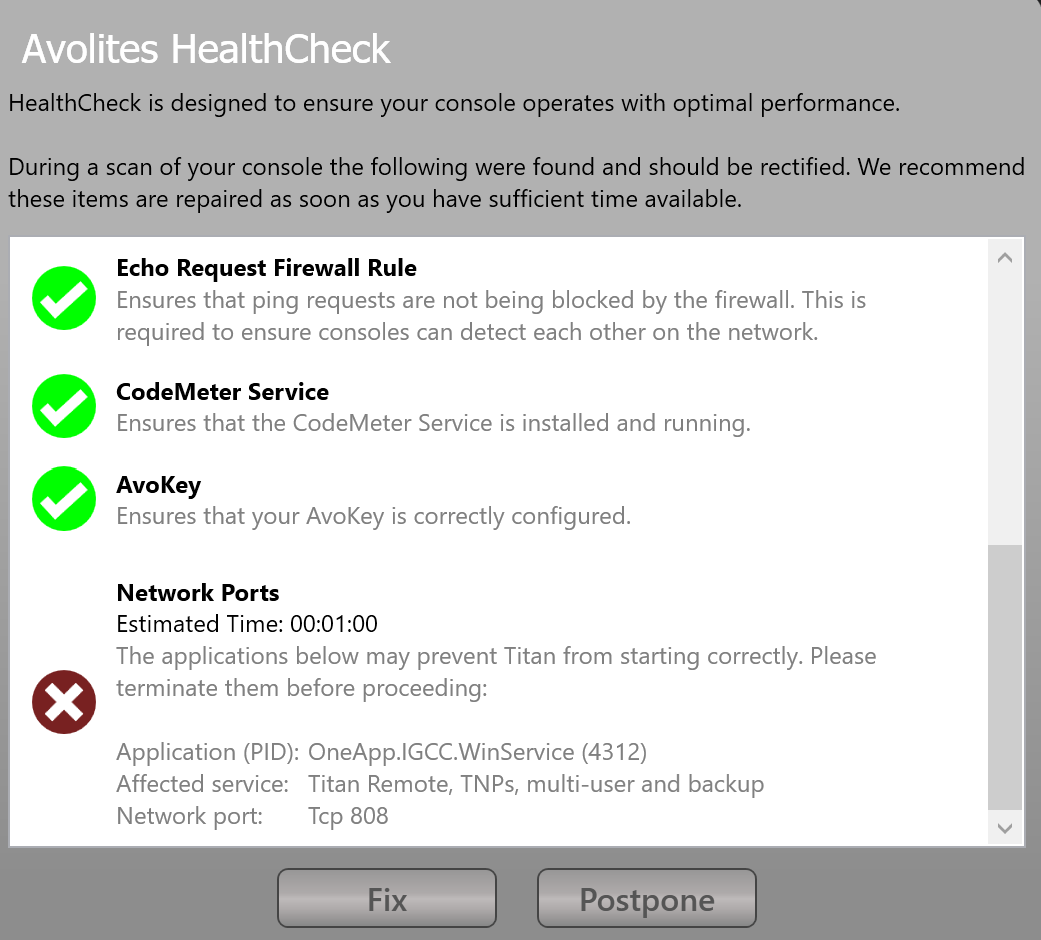
If you have received the following message after launching Titan, you will need to close the application using the port which Titan requires.To close the application listed in the ‘Network Ports’ dialogue box, you will need to open Task Manager, locate the application or service and stop this. When you have stopped this, click ‘OK’ to retry.
If OneApp.IGCC.WinService, appears in the dialogue box, follow the instructions listed below:
Intel has issued a driver update for their built in graphics cards that may cause issues with Titan starting up.
If you try and launch a PC suite application ( Simulator, TitanOne, TitanGo, and Mobile) and it does not complete start up and stays on the “pulsing grey Titan screen”. Also check in the Task Manager for windows if you see the “oneapp.igcc.winservice”, and or “Intel® Graphics Command Center Service” You will need to perform the following fix to
allow Titan to run again.This driver update may come thru a windows update or by installing the Intel drivers manually. The drivers lock up ports required by Titan to run correctly.
After confirming in the Task Manger of Windows (control- alt – delete on keyboard then select task manager from the pop up list) that the “oneapp.igcc.winservice”, and or “Intel® Graphics Command Center Service” are running do the following:
- In Task Manger click the Services
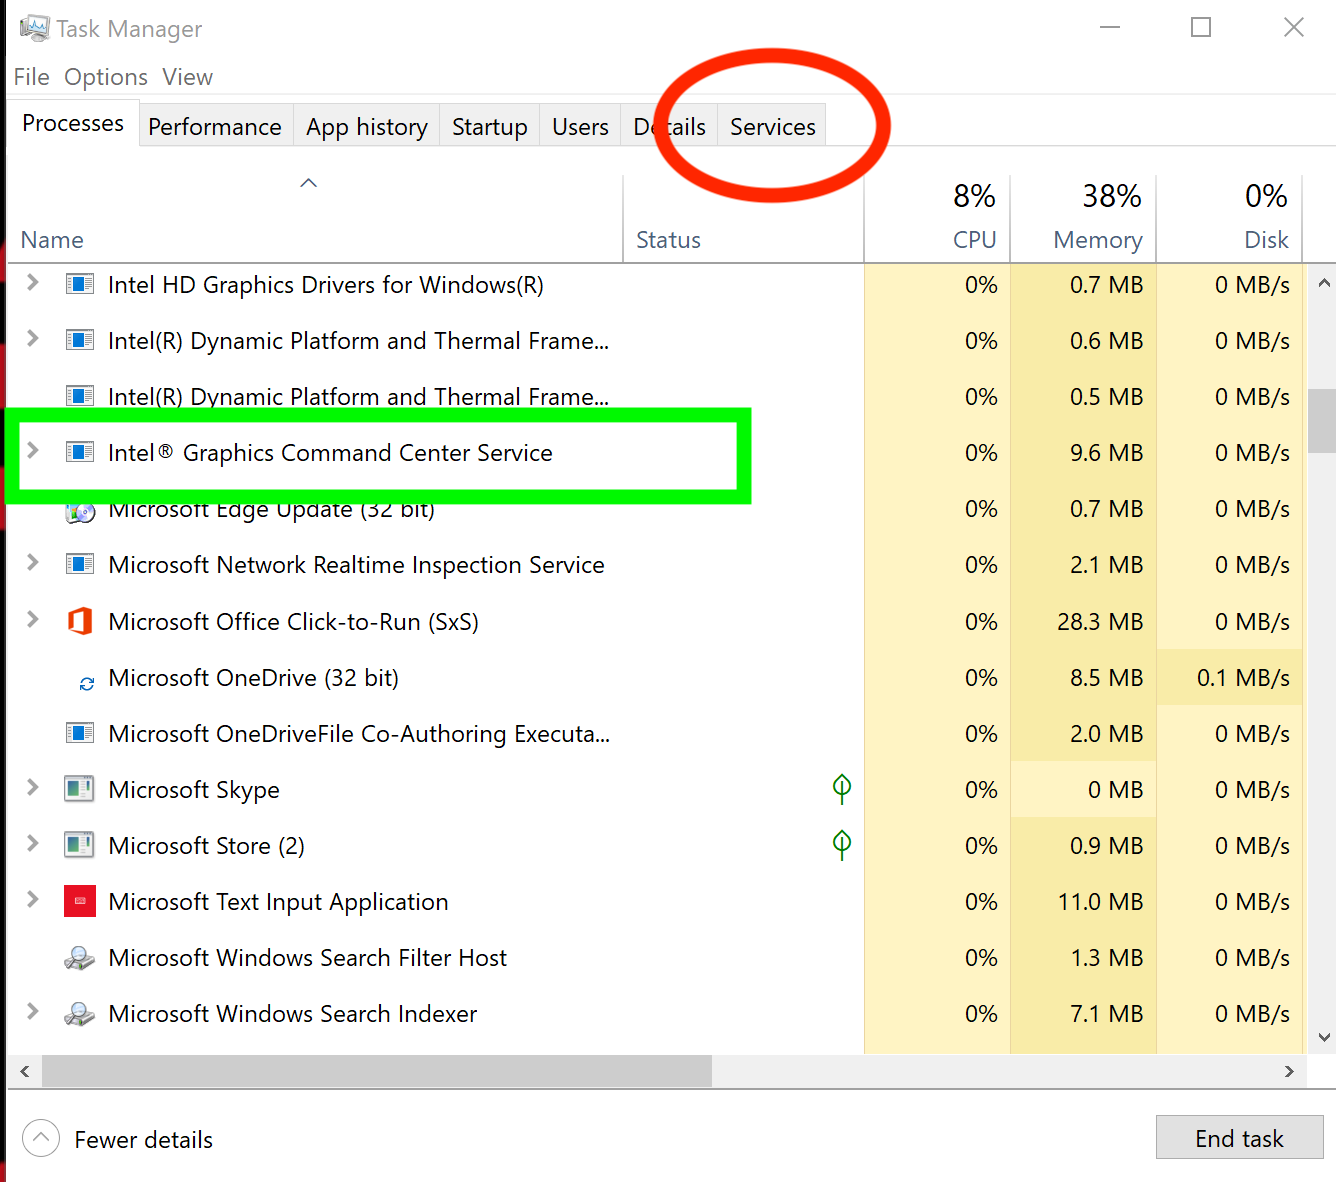
- At the bottom click the “Open Services
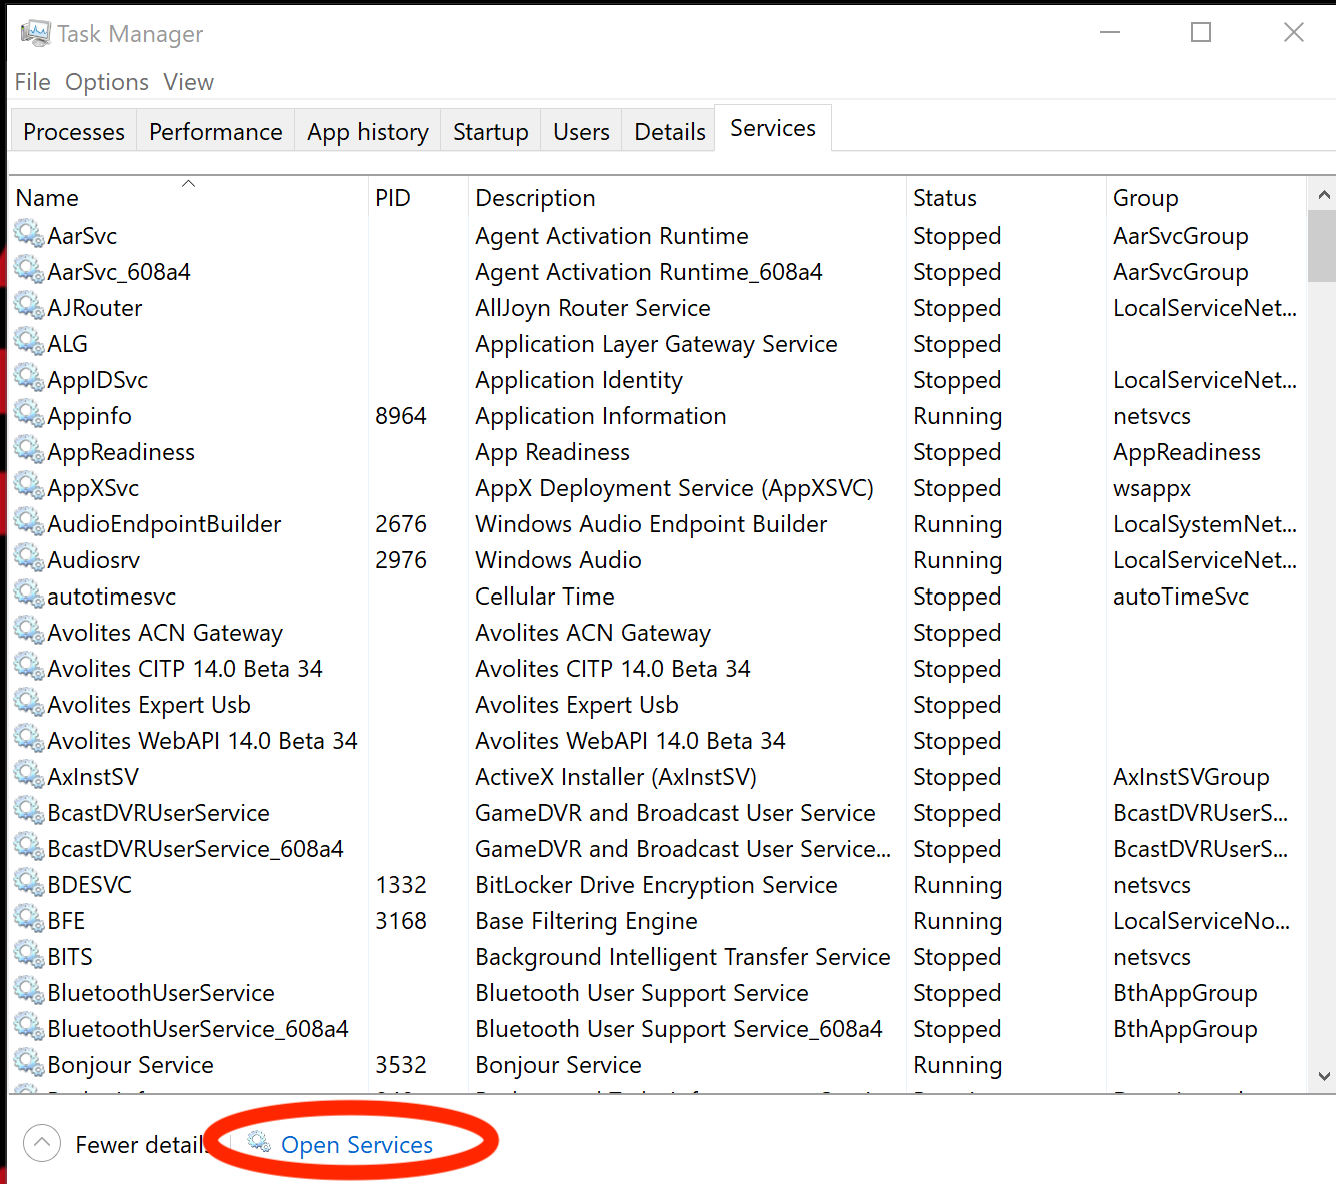
- In the “Services” window that opens find “Intel (R) Graphics Command Center Service”
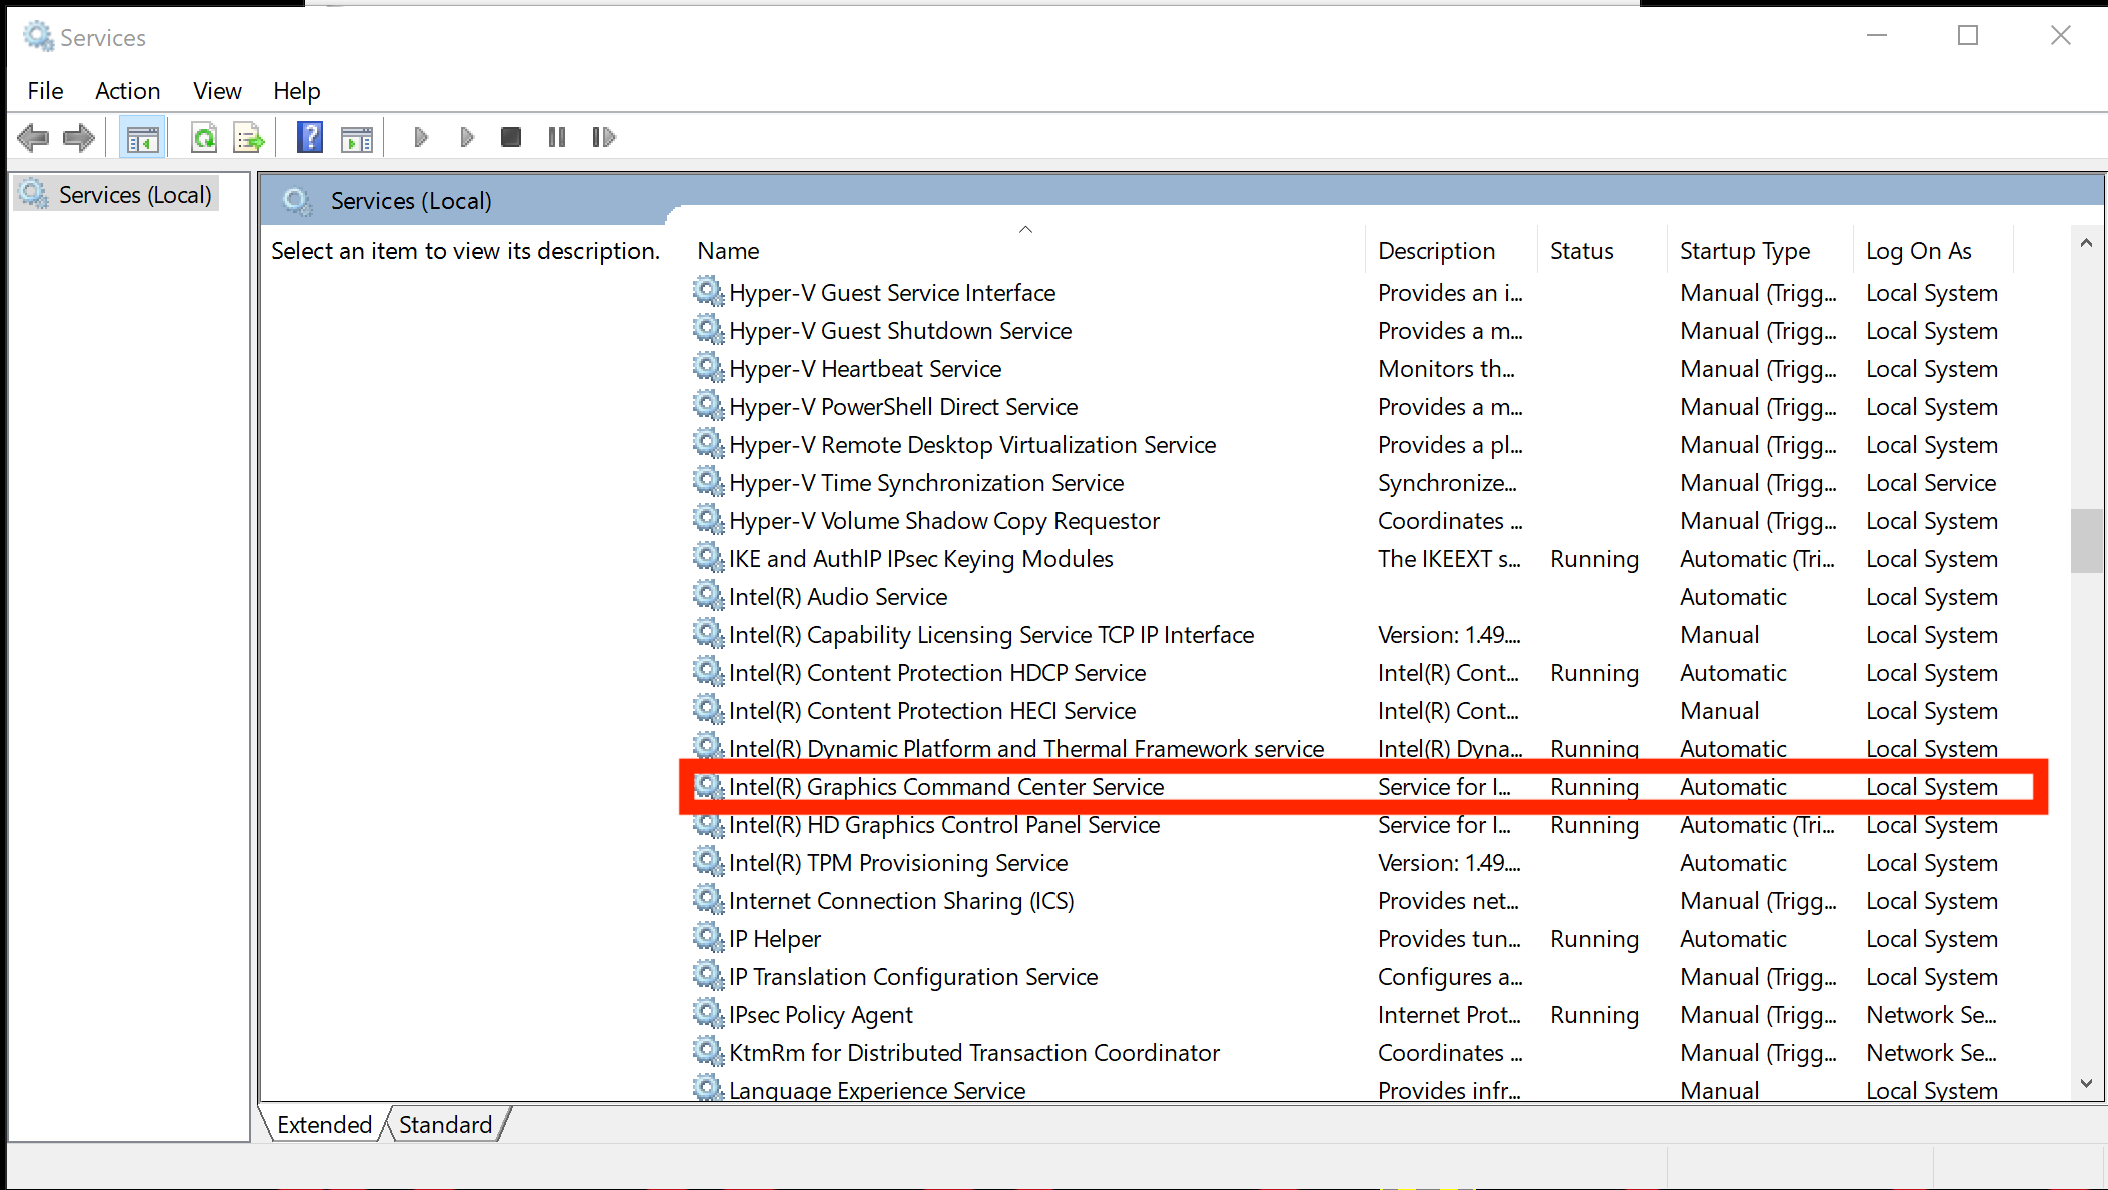
- Double click on it
- In the Window that opens, change the “Startup type” from “Automatic” to “Disabled”
- Click Apply
- Close the “Intel(R) Graphics Command Center Service Properties” and the “Services” windows
- Restart the computer.
Titan should now launch and run correctly.
Thru our testing disabling this service does not seem to have adverse effects. If you have graphical errors outside of Titan, you may wish to do the same steps but change from “ Disabled” to “Automatic” and restart the computer again , then perform
the fix again next time you need Titan.A video of this has also been created here: https://youtu.be/wfJUFc2rCCE
Alternative steps provided by Intel (Not Recommended):
Uninstall all the drivers, as they are only generic and might not be compatible with the laptop.
Our Intel drivers are only generic, we provide our drivers to the laptop manufacturers and they modify them in order to work with their laptops.
The laptop manufacturers integrated the graphic processor and soldered it down to their motherboard, the laptop manufacturer assures the compatibility and the drivers.We strongly suggest to install only the drivers from the laptop manufacturer
installing incompatible drivers can create some registry issues. the following troubleshooting steps should be applied:Check that the OS isupdate to the latest version
1. Download the latest graphic driver from the laptop manufacturer website for that specific model of laptop and save it on the computer.
2. Disconnect from the Internet so no new drivers are automatically installed by Windows Update.
3. Uninstall the graphic driver and all the other legacy drivers from Control Panel > Programs and Features.
4. Restart the computer.
5. Confirm in Device Manager > Video Adapters the controller is listed as ‘Microsoft Basic Display Adapter’ > if not, repeat steps 2 through 4.
6. If the adapter continues to be listed as ‘Intel HD Graphics’ or similar, and no other Intel Graphics driver is listed under ‘Programs and Features’ for removal, then it means Windows has switched to a previously installed Legacy driver. At this
point we can remove Legacy drivers from Device Manager:
6.1.1 Right-click on ‘Intel HD Graphics’ or similar, and select ‘Uninstall Device’
6.1.2 In the pop-up window make sure ‘Delete the driver software for this device’ is checked.
6.1.3 Click on ‘Uninstall’.6.1.4 Restart. (Repeat steps 6.1.1 through 6.1.4 until the device gets listed as ‘Microsoft Basic Display Adapter’)
7. Install the graphic driver that was downloaded on step 1.
8. Restart the computer.
9. Reconnect to the Internet.
10. Download the Intel Graphics Command Centre from the Microsoft Store. ‘ -
When using a T1, T2, T3 or Titan Mobile, the device loses power and becomes inoperable. How do I fix this?
By default, Windows enables the power saving feature all USB ports known as USB Selective Suspend. This feature is supposed to save power by shutting down USB ports that are only used intermittently.
Sometimes the USB port does not get turned back on when it is needed or is inadvertently turned off.
For USB devices such as the T1,T2, T3 and Titan Mobile, powering down the USB port causes the devices to disconnect and possibly not reconnect properly, resulting in errors or an inoperable device.
You can prevent this situation from happening by disabling the USB Selective Suspend feature globally on your PC using the procedure below.
-
Arena console network switch POE indication does not work. How do I fix this?
We wish to advise you of an immediate product change to our Arena console model. This affects Arena consoles serial number 01176 and above. Due to the continuing global microchip supply shortages, we have had to take action to upgrade the current Network Switch to a later version.
This later version of switch has different firmware and security settings, which currently prevents the PoE status being visible on the back of the console.
The actual PoE is functional and working as normal, the change we need to make only affects the PoE indication.
We are working with the Network Switch supplier to resolve this issue, as soon as possible. The resolution to this problem will come in the form of a firmware upgrade. At present we do not have a definite date for the upgrade, however, we will keep our distributor network and affected Arena customers updated with our progress.
In the meantime, should you have any issues or problems you wish to discuss. Please contact your local distributor or Avolites directly at support@avolites.com
-
‘Failed to save show’ - I am unable to save my Titan show file on both internal and removable hard disks. How do I fix this?
We have identified CodeMeter Version 7.30 may prevent your show files from saving. To check which version of CodeMeter is installed, you will need to launch CodeMeter Control Panel, click help and then help again.
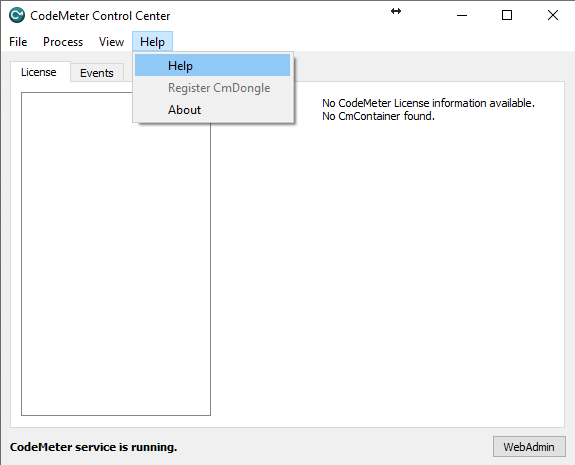
If you have the version above installed (7.30), then you will need to download and install the latest version, click here.
Note: CodeMeter V7.40b or above is required. Once you have updated the CodeMeter, you will need to create a new show file in Titan.
If you are still unable to save your show file after updating the runtime application, please contact support@avolites.com.
-
Why is my T1/T2/T3 not functioning properly when connected to my computer?
Important Notice: Update to the latest version of Titan PC Suite, to avoid licensing errors, USB disconnections, and “Session Connection Failed” issues.
If your device isn’t functioning as expected, it could be due to insufficient power being supplied by the front USB ports on your desktop. While the dongle may appear to work initially, it may fail during tasks that require higher power, such as decrypting software.
Troubleshooting Steps:
1. Connect Directly to the Motherboard:
Try plugging the dongle directly into one of the USB ports on the back of your computer, which are connected to the motherboard. These ports typically provide more consistent power compared to front ports.2. Use a Shorter USB Cable:
A shorter cable can reduce power loss and improve connectivity. Try using a shorter USB cable to connect the dongle.3. Consider a Higher-Quality USB Cable:
In some cases, upgrading to a more expensive, better-shielded USB cable may help ensure proper power and data transmission.4. Use a Powered USB Hub:
If the above steps don’t resolve the issue, consider using a powered USB hub, which can provide additional power to the dongle.5. Disable Quick Fast Boot:
Videos instructions for disabling this are available in the following link: https://www.youtube.com/watch?v=6P9qpYVkPd0&feature=youtu.be
These steps should help ensure your device receives adequate power and functions correctly.
-
Why is my portable monitor not working with my Avolites console?
Many portable monitors (USB-powered) draw well in excess of the 500mA and 900mA current limits of standards-compliant USB 2.0 and 3.0 ports respectively.
Due to this, there is a risk of malfunction or damage to the console when such monitors are powered from the console’s USB ports.
It is also important to note that many of these monitors do not bear any certification of compliance with the DisplayPort, HDMI, or USB standards.
All Avolites products are tested for compatibility with a range of conventional, fully certified monitors from reputable manufacturers.
While a particular (non-compliant) monitor may appear to be functional with one product, this does not guarantee functionality with a different product.
Avolites cannot provide guarantees about the compatibility or functionality of non-certified monitors when used with Avolites products, and cannot provide technical support to aid the use of third-party, non-compliant products.
